
How I Revamped My Kitchen Without Replacing The Cupboards
When we moved into our home in May 2015, the entire house had been completely renovated by a property developer. He’d done a great job, tbh. He’d kept the majority of the original features and those that were missing, he replaced sympathetically. The house was, effectively, a complete blank canvas; the kitchen and the bathrooms were all brand new and there was nothing structural to be done whatsoever. For me, it was basically a dream, my ideas for each room overflowed and thus my addiction to documenting what I did on Instagram was born. Ah, the old days, when no one cared about numbers or algorithms and the idea of earning a living from the platform was non existent. How things can change in just a few years. Madness.

Anyway, the kitchen was cream. Literally, all cream. The walls, the cupboards, the floor. An abundance of cream, more cream than a dairy farm, in fact. The kitchen had wall units with glass fronts and internal lights to display my grubby glassware to all. There was an island bar in the centre (Joe was in his element; he’d always had a dream of sitting at an island bar with a MacBook with coffee and a biscuit, like some life insurance advert) and it was all sparkly new. However, I really didn’t like it very much. I had an aversion to wall units and the colour of the cupboards and matching twisted brass handles did nothing for me.
So in the summer of 2016, I decided to update it. I recruited Miles, The Worlds Best Decorator, to paint the cupboards whilst we were on holiday (a job of hell which involved a lot of primer and much swearing from Miles) and Joe and I removed the wall units and replaced them with oak shelves. I added a central light, changed the cupboard handles and bought a huge vintage Persian rug for £120 from eBay which transformed the space. It was immediately regrammed by Apartment Therapy to what was, at the time, a record number of likes and was subject to much abuse from their followers due to the RIDICULOUS concept, apparently, of having a rug in your kitchen. I wrote a blog about what I did and how I planned it - you can read it here.

My revamped (the first time) kitchen. I was totally over the blue cupboards and needed a change.
So, two and a half years later and, predictably, I decided it was time for a change. The dark cupboards were too dark, I had stopped feeling the love for the navy and, indeed, the worktop, which had never really gelled with the rest of the room. I’d already removed the island bar (sorry Joe) and replaced it with a table and chairs which was far more practical. I’d gone off the central brown bead chandelier - it felt fussy and again, too dark for the room. The radiator didn’t work properly and the work area lighting was poor. Altogether, it was looking a little bit shabby. I needed to make some changes, but the kitchen was only four years old. I was happy with the layout, it would have been sacrilege, quite frankly, to rip out perfectly good cupboards and replace them with new. I wanted to make it a cosier space - mornings are frantic with kids rushing for the school bus, Joe shouting ‘TWO MINUTES’ ten minutes prior in order to get them out of the door before it zooms off into the distance without them. I wanted to transform it into a calm and neutral space.
I’d seen a kitchen on Pinterest that I’d loved - featured on Architectural Digest, it had a combination of textures that really made me happy. Ply doors, wooden floor, farmhouse table, neutral decor. The whole effect was light and bright but also sustainable and bursting with natural materials. I wanted this look for my own kitchen so I investigated how I could incorporate these components but also recycle and freecycle what I no longer needed without resorting to landfill. Just a small task, then.
Three years down the line since my first revamp and working partly with brands to achieve the end result, I set out my mood board, wrote a blog detailing my intentions and got started. Here’s what I did.

Removed The Around The Fridge Cupboard
The fridge was surrounded by an ornate cupboard that I REALLY actively disliked. However, it was ridiculously easy to remove and created a whole new area of space which was suitable for extending the work surface.
Freecycled, collected within a day. Ornate cupboard, be gone. Bring on the extra work space.

Replaced The Doors
So, as mentioned above, I was kind of over navy kitchens. I’d repainted mine a few years ago and despite looking a bit battered, they’d held up well. But I needed a change. However, I still loved the layout of my kitchen and I didn’t want to replace the Howden carcasses - they were in perfectly good order and totally acceptable to be recycled. The answer? Replace the doors only. I decided to go with a company based in Brighton called Custom Fronts. The specialise in sustainable plywood fronts (not just for kitchens) and I really liked the idea of using a natural material that would last.
Custom Fronts supplied a form template for measurements and I recruited Kennet the kitchen fitter to complete it. They then created oil birch plywood doors according to the measurements which arrived, shipped on a pallet to my home, complete with hinge holes and built in handles. I had a couple of tricky areas including a wine rack surround and some small side drawers but they took it all on board and came up with the goods. It took about four hours for Kennet to fit them and they were perfect - they immediately made the kitchen ten times lighter. I posted the old doors on Freecycle and they were collected within a day by a couple who had bought a renovation project.

Replaced The Worktops
The worktops in the kitchen had been the one item that when I had revamped the space the first time, I’d wished I was able to change. A dark brown, it was excellent quality but the colour didn’t fit with the scheme one bit. So this time, I worked with natural quartz surface company, Caesarstone, to replace it. They provided me with a beautiful white marble, Calacatta Nuvo, which had a deep vein within it - I knew it would look amazing with the plywood fronts.
I found a local fabricator called Belgravia Stone who templated it for me and cut the marble to fit. I also decided to take the marble up behind the cooker as a splash back - this was a difficult one to fit and involved trimming it on site. I’m super happy with the results, the surfaces are so reflective and combined with a gloss ceiling brings in loads of light. And the old worktops? They were taken away and repurposed in student houses by a builder friend. Perfect.

Replaced The Sink
Now, in the original work surface I’d had a 1.5 bowl sink. I never really used it so I decided the best option for me was a full sink. I chose the K700 undermounted stainless steel sink from Grohe and it was so much more spacious for my needs.
The fabricator included the dimensions in the cutting of the worktop and it fitted beautifully. Super pleased. The old sink and tap went off to the student house. Everyone’s a winner.

Added A Hot Tap
My husband Joe has very little interest in any interior plans, but he was very excited about this one. Grohe provided me with the Grohe Red hot tap which is a combination of hot water on demand plus a standard tap for every day use. The equipment (boiler, etc) goes beneath the sink and can be fitted to your normal water outlet with no difficulty at all. I’ll be writing a blog detailing it’s many benefits later on but it’s an absolute REVELATION.
It has two settings - you can hold the button down and the red setting stops upon release, or you can switch to the green setting which allows you to fill a pan without holding it. And even better, it releases worktop space as you no longer need a kettle. I LOVE it. Joe’s kitchen goals achieved.

Painted It White. Obvs.
White was the only way to go. I used Brilliant White from Valspar on the walls and the same in water based gloss on the ceiling. I asked Miles to do this job for me - know your limits. I can’t even imagine the state of the room should I have attempted this task myself, let alone my hair.
I’m not going to lie, he wasn’t impressed by the idea. But he did it and I’m SO glad it did as it makes such a difference in the room. The light bounces off the work surface and reflects and it’s so much lighter in the space. Definitely a top tip.

Lit It All Up
So my key factor in creating my dream kitchen was light. Lots of it. But also light that could be dimmed for a romantic meal for two (an annual experience, but no less important). Originally, I had in place fishermans lights above the oak shelves which is where I do most of my food prep. These didn’t give off enough light and more importantly, didn’t hang over the shelves. I admit now that this was a massive design flaw in my last revamp. So I started with task wall lights from Original BTC which I positioned above the shelves. Chrome with a black shade, they come in several different colours and have completely transformed the work area. They’re adjustable so I can move them to focus on whatever area I’m working in and the electrician set up a socket whereby they are operated by one switch next to the cooker. Perfect.
I needed a central light and I wanted to find something that was clean lined and simple, in sympathy with the rest of the kitchen style. I trawled eBay for a Louis Poulsen vintage light and managed to find one (with Wendy from Homeplace offering me advice on the side) for £190. I figured it was a good investment as they hold their value, plus the style is a design classic that will never date. I ordered a Vita cord kit online which was around £16 to give it the authentic look. It’s on a dimmer switch and perfectly positioned above the table.
I’d removed the extractor fan from above the cooker. This was another question I was often asked - I have two windows in the room for ventilation and plus I’d never actually turned it on in four years. Removing it made the space above the cooker much more streamlined and I added two LED spotlights in brushed chrome which cost around £20 each. Let there be light. I sold the chandelier to an Instagram friend who sprayed it white and transformed it.

Replaced The Floor
The floor was large cream tiles that were FREEZING to the feet. The kitchen is one of the coldest rooms in the house - the boiler is miles away from it - so anything I could do to make it feel warmer was a winner. I’d worked with Amtico before on my hallway and was super impressed with the result (again, I’d had tiles and replacing with LVF was a game changer) so they were my first port of call. I went for a chevron (also known as pleat) design in York Oak and the result was transformative. Colourwise, I already had oak shelves on the walls so I tried to match the colour as closely as possible.
They screeded over the tiles within a couple of hours and laid the flooring on the top. I received many questions on my Instagram feed about why I choose LVF over wood. I’d had engineered wood flooring in a previous home kitchen - it looked fab, but every time I opened the dishwasher and water came out, it stained the floor. The nail in the coffin was a water leak beneath the sink which caused the wood to rise and split. So for me, it’s LVF all the way from now on. It’s significantly warmer on the feet than tiled flooring and looks amazing.

Replaced The Dodgy Radiator
As stated, the kitchen was bloody freezing. This was partly due to a seriously dodgy radiator which gave off as much heat as a warmed croissant. I’ve worked with soak.com before to update radiators and this room was no exception. I chose the same radiator that I’ve got pretty much throughout the ground floor, the traditional colosseum three bar radiator in white.
I literally can’t tell you how much warmer it makes the room - yesterday I caught the dog leaning against it after he’d been for a walk. It looks great and more importantly is now Insta photographable. Priorities, ha. Oh, and I put the radiator on Freecycle and it was collected with two hours. Excellent.

Changed The Sockets
I love the combination of marble and gold so I updated the plug sockets that were most on view. I worked with Dowsing & Reynolds who have a huge selection of such products and two of the ones I chose have charger points which is an absolute winner in our family seeing as we have around 750 chargeable items between the five of us and are constantly arguing over leads.
I also invested in a dimmer switch in the same colour which operates the central light and the ceiling spotlights. Much, much prettier.

Sanded Down A Workbench
Our house came complete with a workbench in the garage which I hadn’t really examined closely. It was covered in years of varnish and huge dollops of paint and wasn’t particularly attractive. Because the top of the table was so deep, I asked Kennet the carpenter to cut the legs down to make it suitable for a dining table.
I bought a Bosch orbital sander from Amazon for about fifty quid - I decided it would be a good investment as it’s something I’ll use again and worth the price. I used 60 grit sandpaper to take the years of varnish and paint off the top. One thing that I hadn’t really taken into account when I started on the project was the fact it needed three people minimum to lift it. Basically, it’s four logs strapped together (according to Kennet, they were strapped together a very long time ago) and it weighs a tonne. At least.
Anyway, after a minor* (*read major) disaster when Joe and I managed to drop the table and it split in half (cue Kennet with several large brackets and a lot of Gorilla Glue), it eventually made it into the kitchen where I used clear Danish wood oil to finish it off. I placed it upon a rug from Modern Rugs which adds some texture to the space. I’m so happy with it, and love the idea that it has a past. Who knows who has sat at this table before us? I bloody love history.
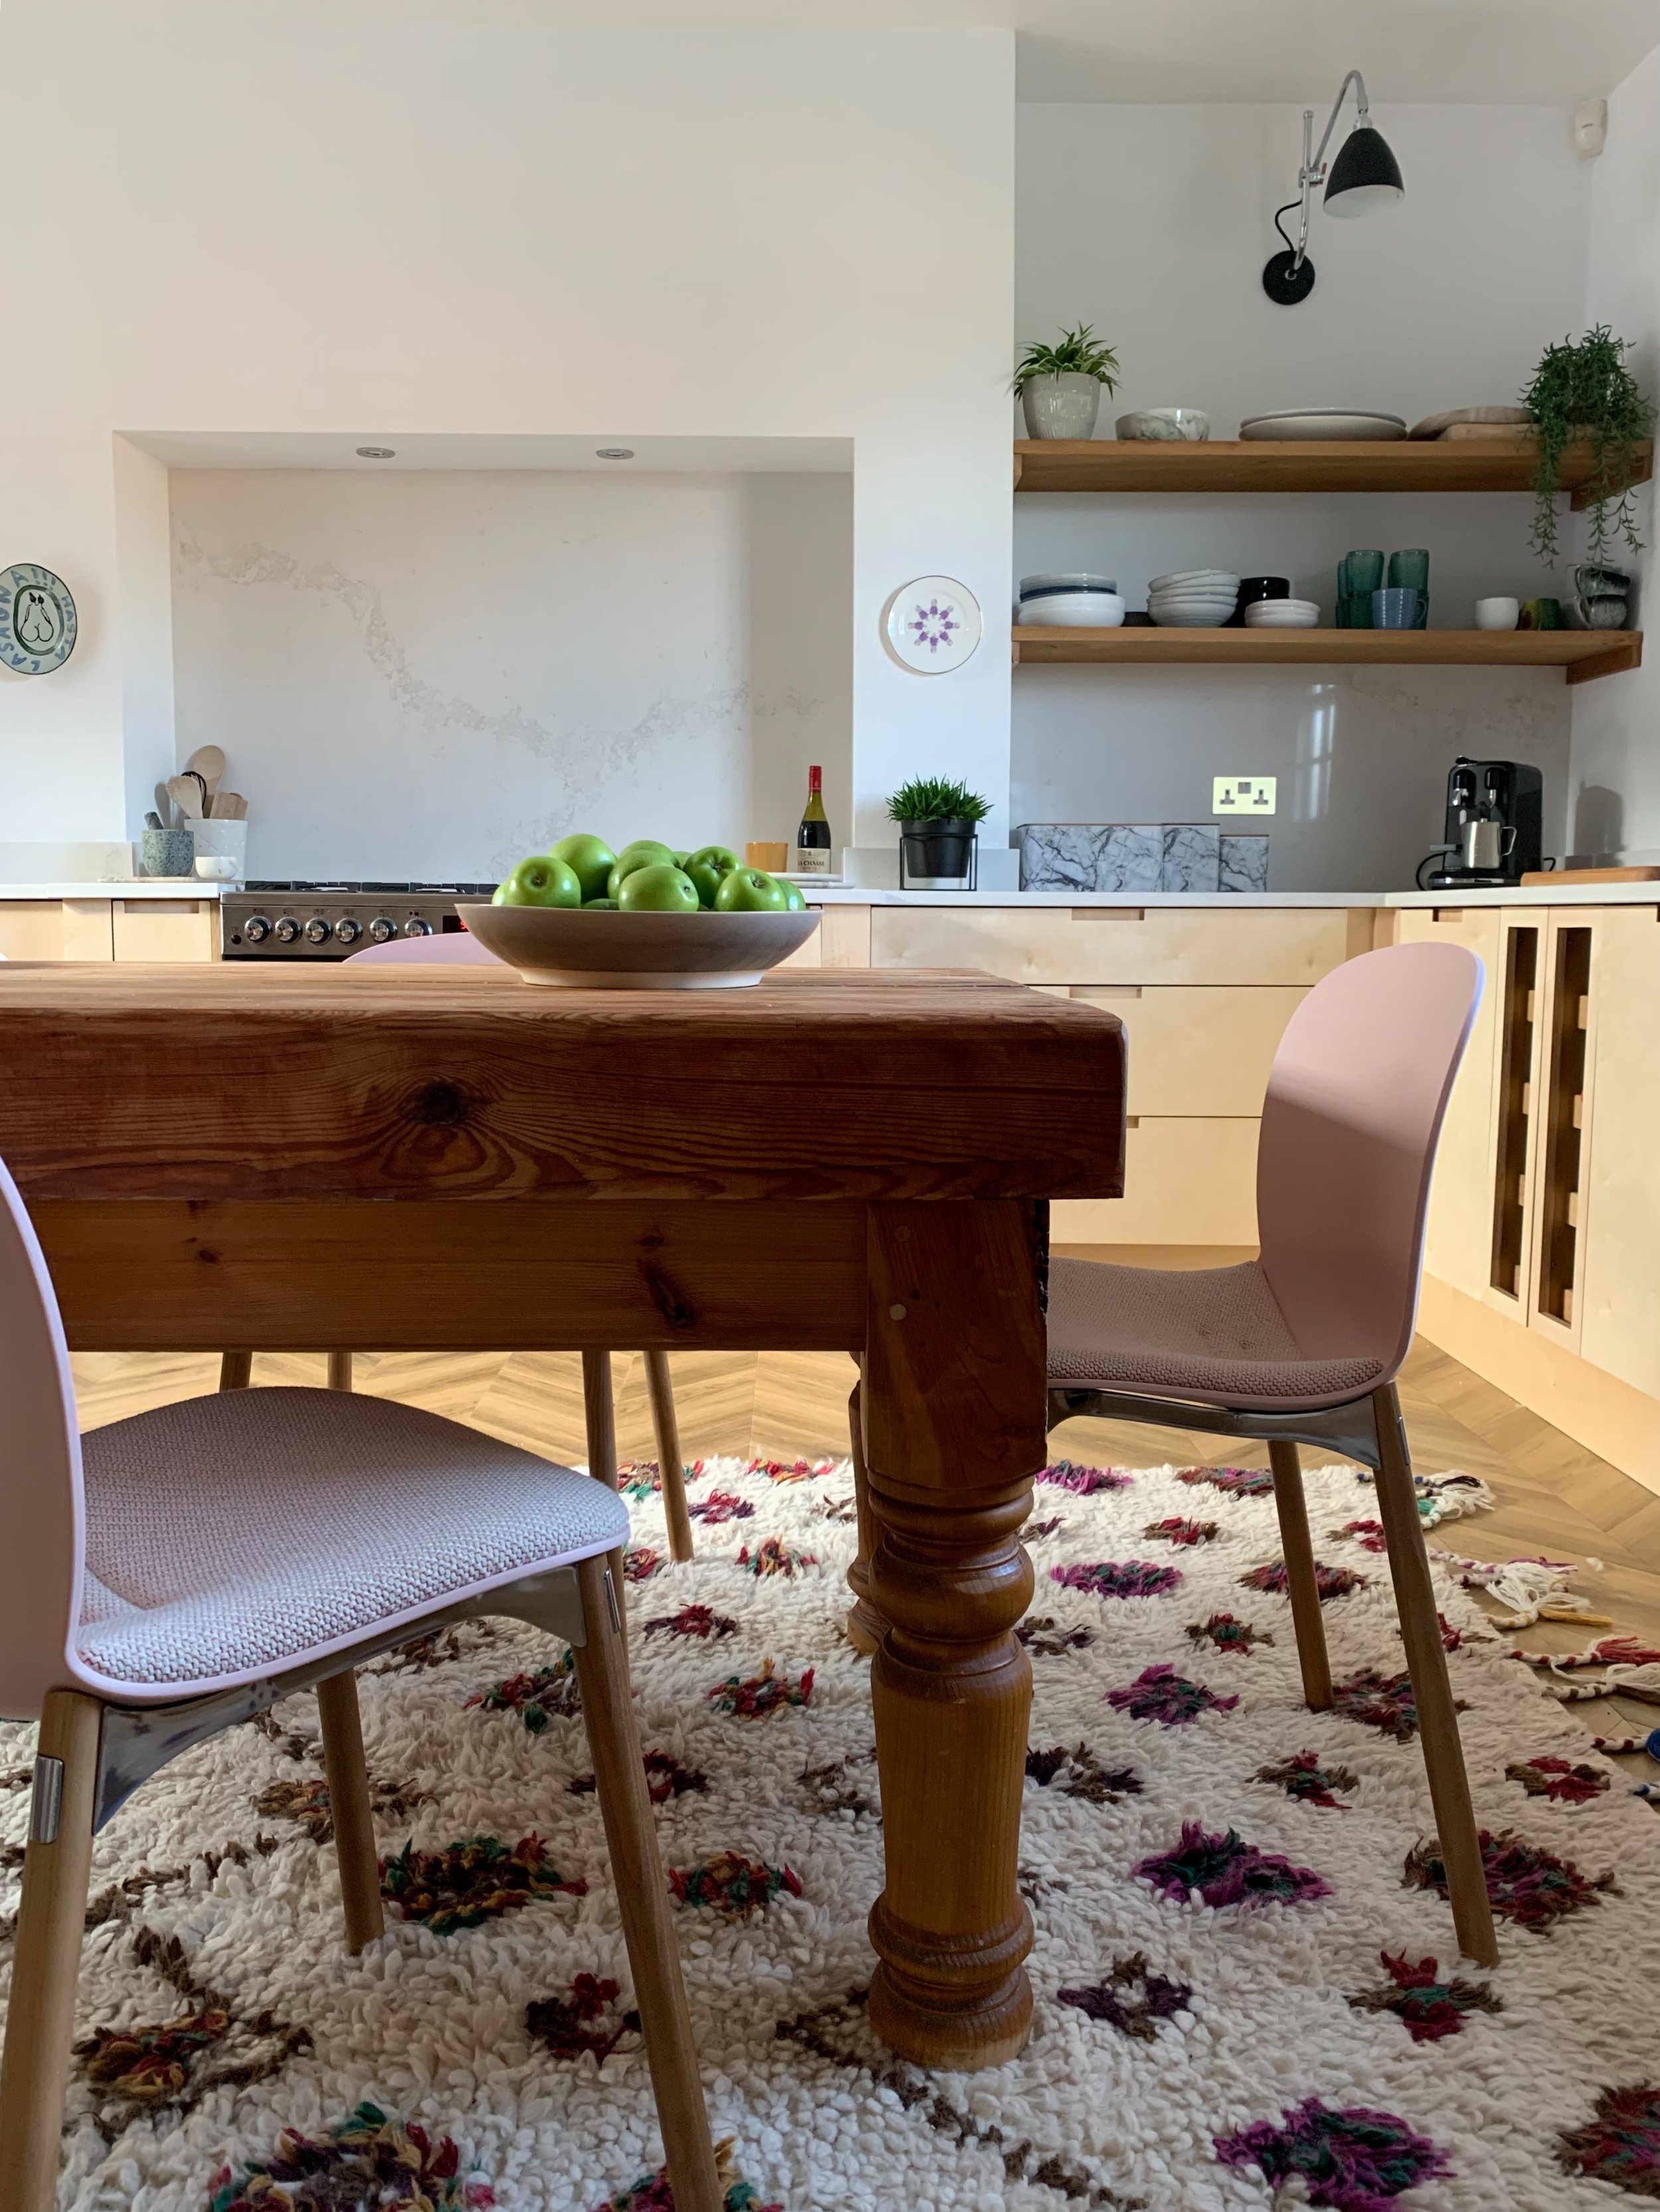
Brought In The Pink
So I wanted a colour contrast to the rest of the room and I loved the idea of pale pink against the birch wood ply. I’d worked with Flokk Design before, a Scandinavian company who focus on sustainable living. I visited their showroom in Clerkenwell and picked both the wool seat and shell from a huge variety of colours. Five RBM Noor chairs (one for each of us) and two sleigh stacking chairs completed the seating arrangements. They’re made from recyclable and recycled materials so they not only look good, they’re also good for the environment.
I’m currently running a competition for you to win four of these chairs in a colour combination of your choice over on my Instagram feed - click here to enter (competition closes Sunday 27 January at 7.00 pm so be quick!).

Painted The Windows
I’d had an idea about painting the windows dark and couldn’t quite decide if it would work or not. However, once I’d finished the rest of the room I decided it needed a bit of edge, so bit the bullet and went for it. Or rather, Miles went for it as I didn’t trust myself to not bollocks it up and seal the windows together for life.
He also painted the door to the guest suite (less elaborate than it sounds) which is above the kitchen in the same paint colour, Johnstones Paint in a shade close to an off black. And I’m so glad that I did - it really makes them stand out and is a good contrast to the rest of the room, tying in the Original BTC task lamps and the framed art.
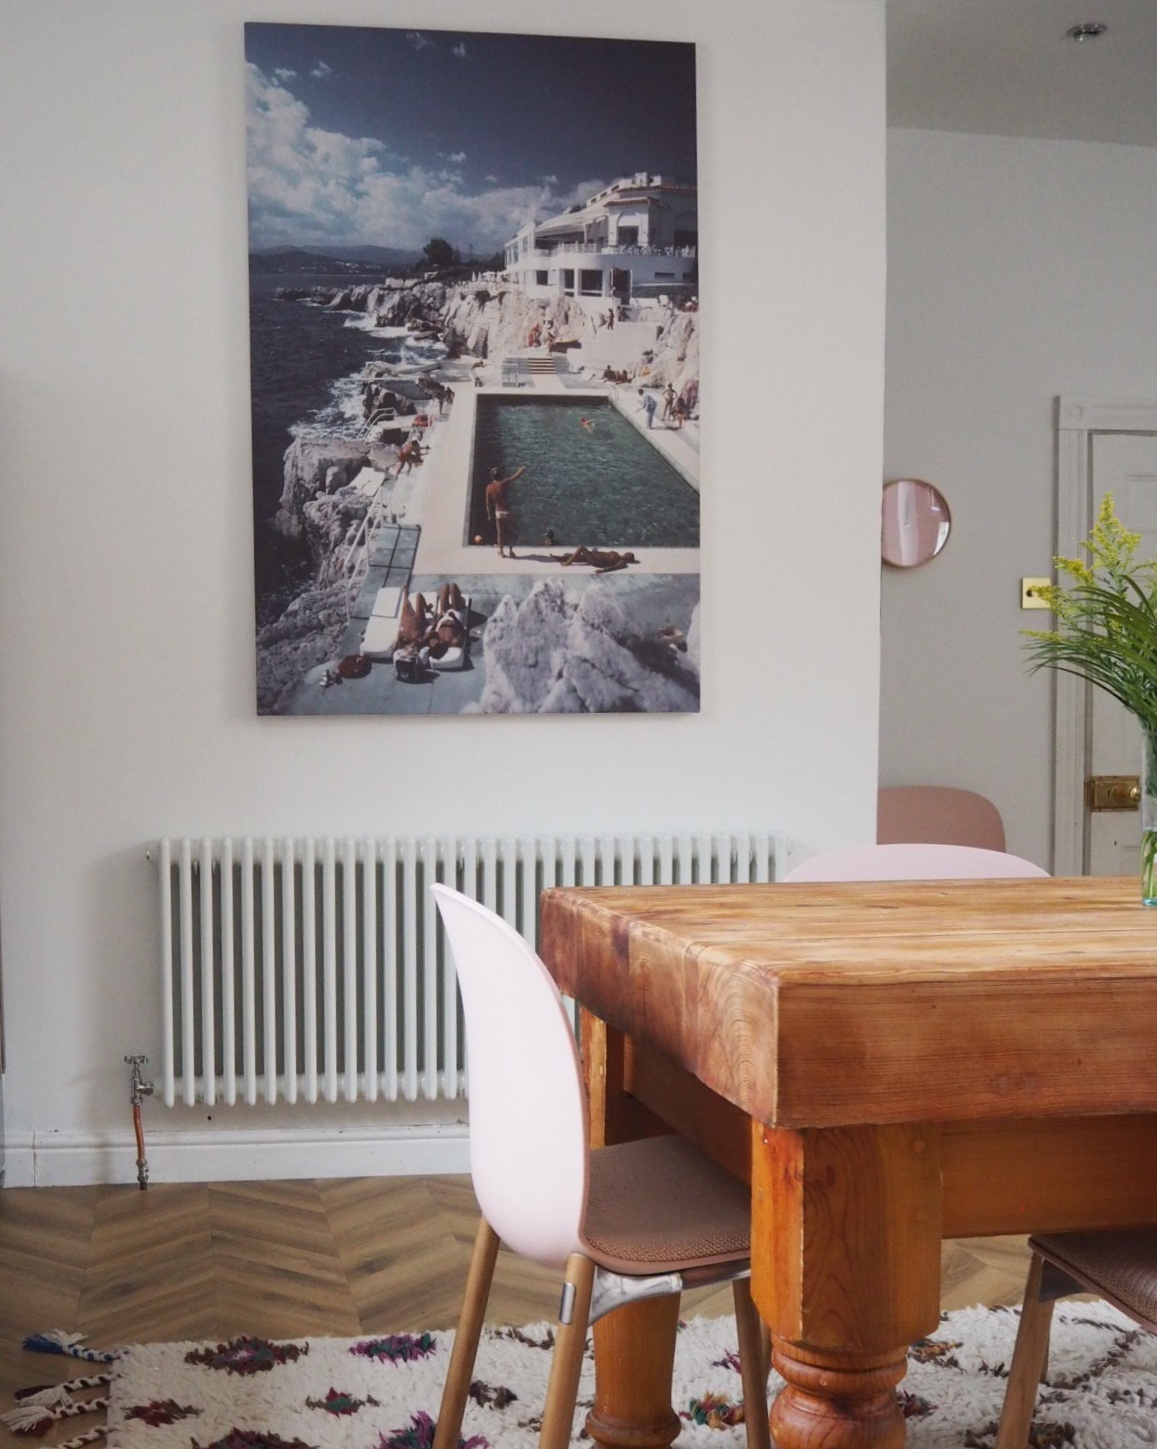
Added Art
Now the blackboard wall was gone, it was the perfect space for my favourite canvas print, Slim Aaron Hotel Du Cap Roc which Joe had bought me years ago from Surface View. It’s a print that never fails to make me smile and wish I was on holiday (Joe once googled how much the Hotel, which is still there, would cost for a weekend - a mere £2,000 a night. Hello Travelodge).
I had recently bought a couple of limited edition prints, one from Pure Evil and one from Dave Buonaguidi so I framed these using mounted frames from an online framing shop, frames.co.uk. They’re perspex so I was able to put them up using Command Brand strips which is so much easier.
After seeing an artist called Laetitia Rouget (Shoopy Studio) on my friend Bianca’s feed, I bought a plate which I hung to the side of the chimney breast, adding another plate I already owned on the other side. Currently the space above the cooker is bare - I’m saving that for my birthday present, a sign which will come from the talented Daisy Emerson.
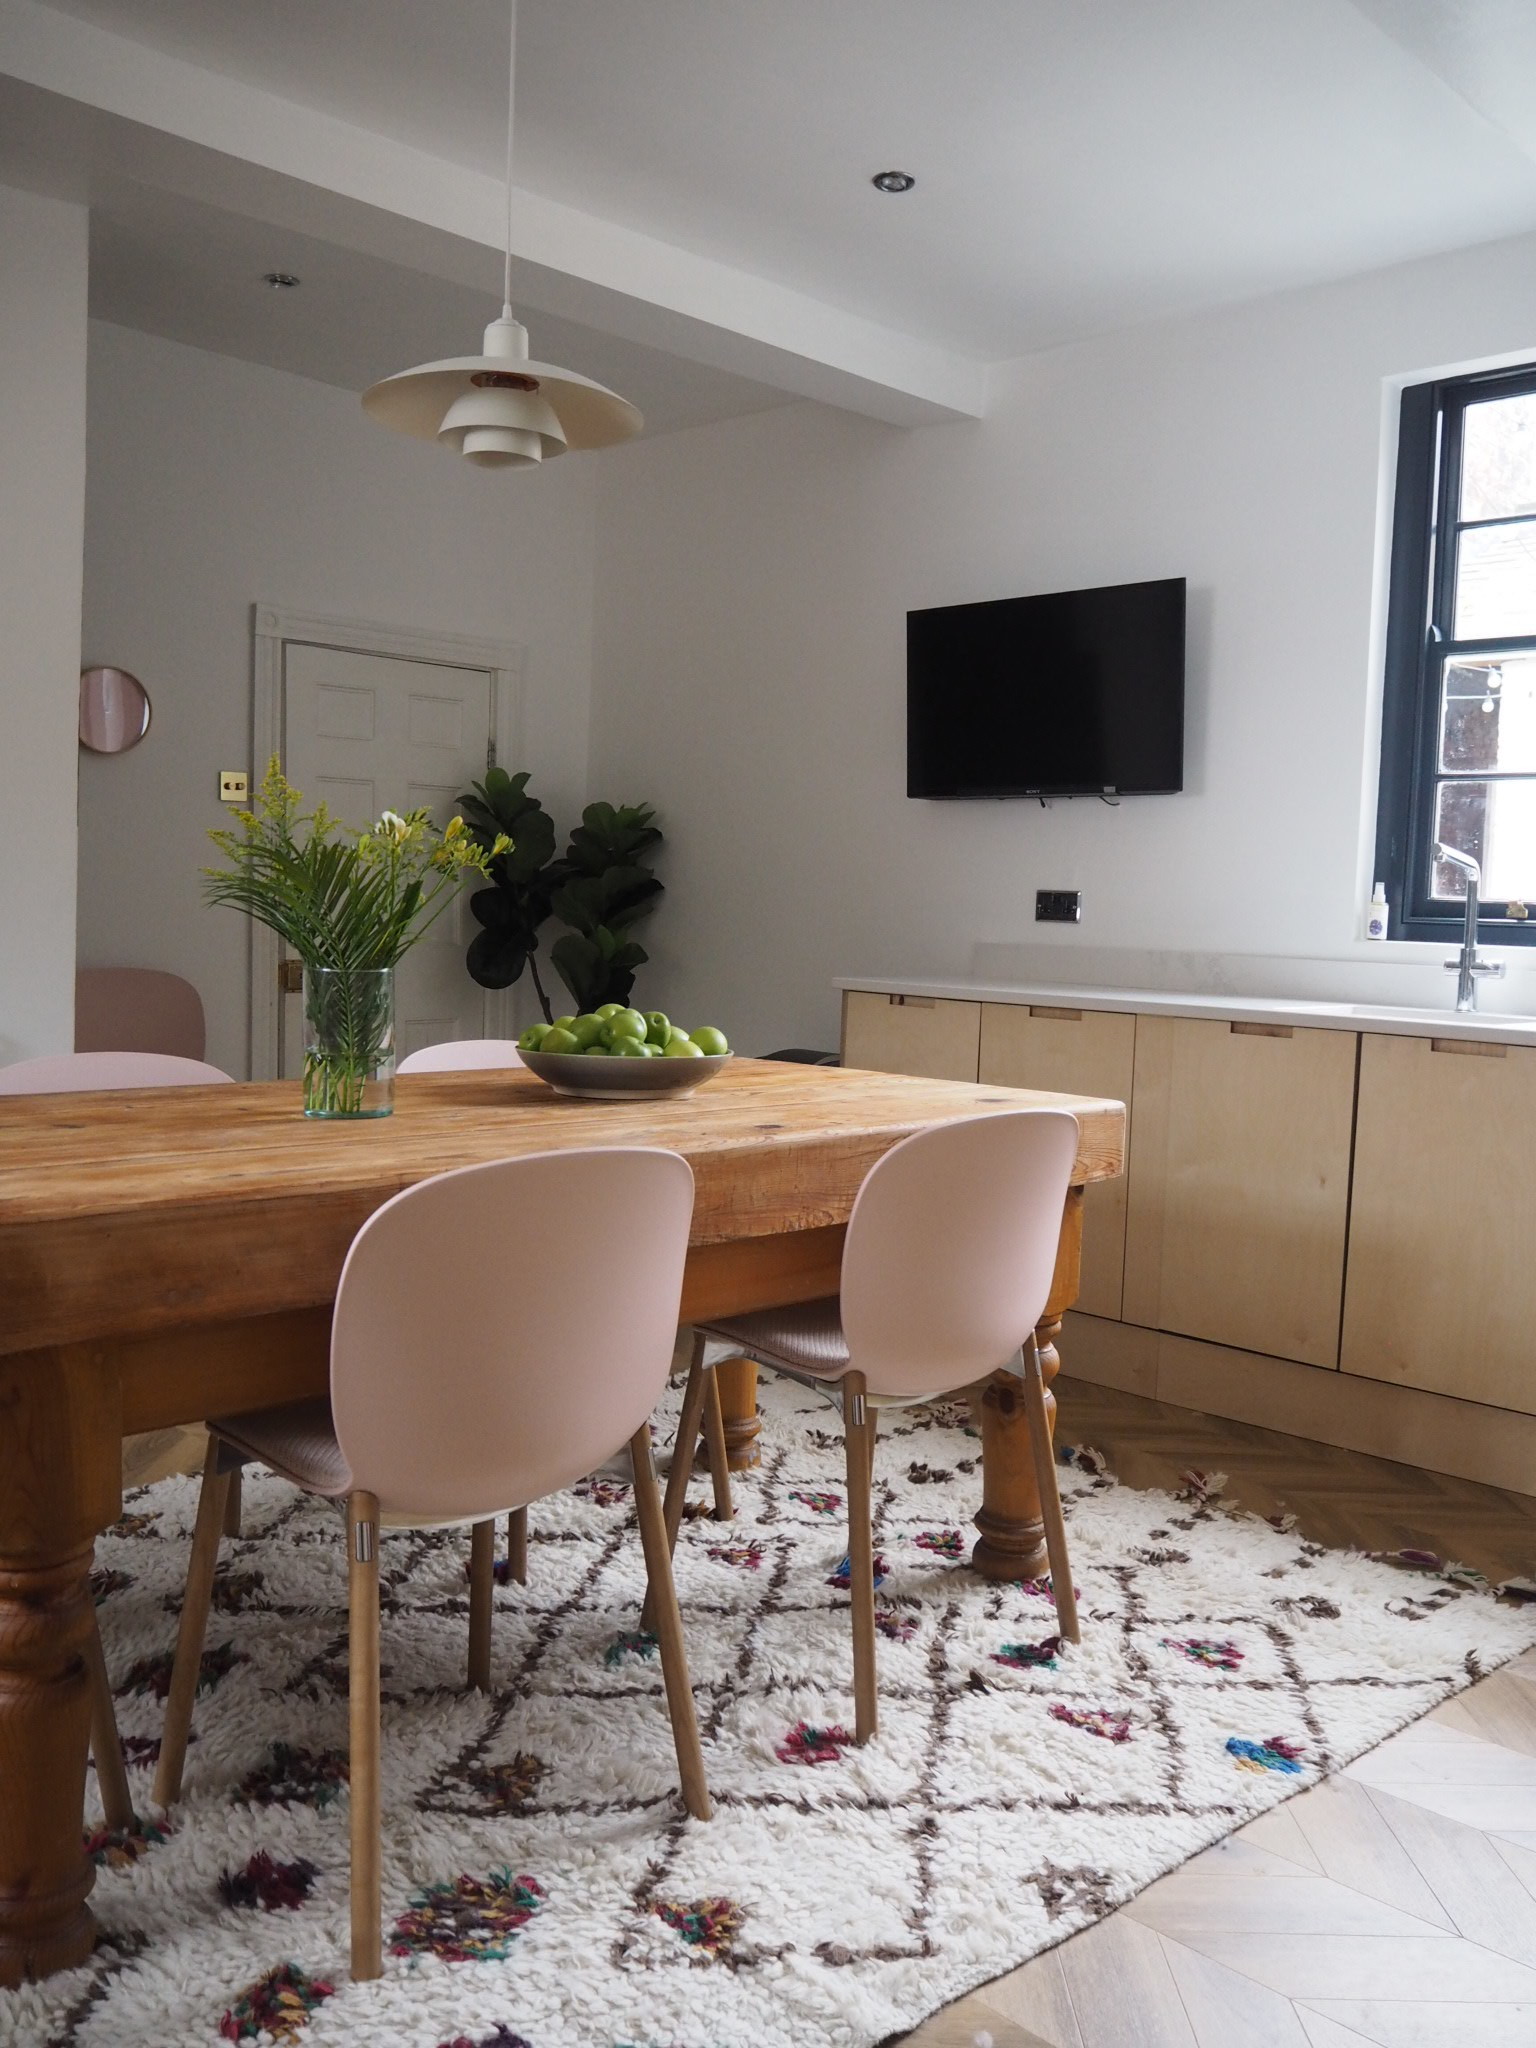
Got Technical
As with all rooms in my house, there’s a TV. Seriously, if there was a world TV shortage then they’d be queuing outside the door. Anyway, Christian the electrician had a good idea to hide the wires by putting a plug socket directly behind the TV so that we didn’t have the abundance of wires looking ugly and spoiling my lovely new worktop. He also used the bracket as a ledge for the Sky box so that it was unseen to the naked eye. Perfect.
I added a pale yellow Hay X Sonos speaker to the shelf so that I could easily shout ‘Alexa, play Bradley Cooper’ and my technical essentials were complete.
And Finally…
By removing the around the fridge cupboard, I was able to extend the workspace. This meant more under worktop space which meant I could update my wine fridge from a small one to a big one. The Amica wine cooler from ao.com was ideal. The perfect ending to my kitchen revamp.

Recycled glassware, So Marrakech.

Alta Crackle Serving Bowl, West Elm.

Recycled glassware, So Marrakech.


I’m really happy with the end result. It feels so much lighter and the gloss ceiling and white worktops have made a huge difference to the space. The revamped table is bigger than the old one and doubles up as a work space when cooking which was an unexpected bonus. Removing the excess cupboards has also made a difference and it’s a room that the family linger in for longer than previous, in part due to the fact that the heating now actually works. This week I’ve invested in a proper recycling bin so that I no longer have to drag broken bin bags out of the tube shaped nightmare we previously had and added a pale pink clock to tie in with the rest of the decor. Hopefully the new look and feel of the room will help get my kids out of the door in a calm and measured fashion. We can always dream.
